|
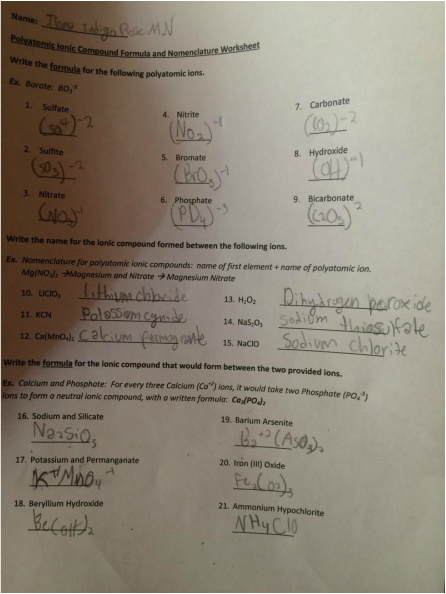
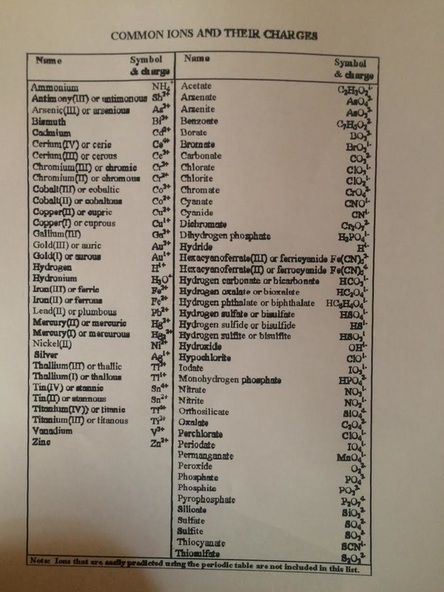
Because of the magic sand lab introductory lesson, I already knew how to make formulas for ionic compounds. For the first part of the worksheet I looked at the columns in the table and found the charges of the elements I needed. In the second section I changed the suffixes of the second elements to "ide." For the last part I just had to do the opposite as I did in the second section. 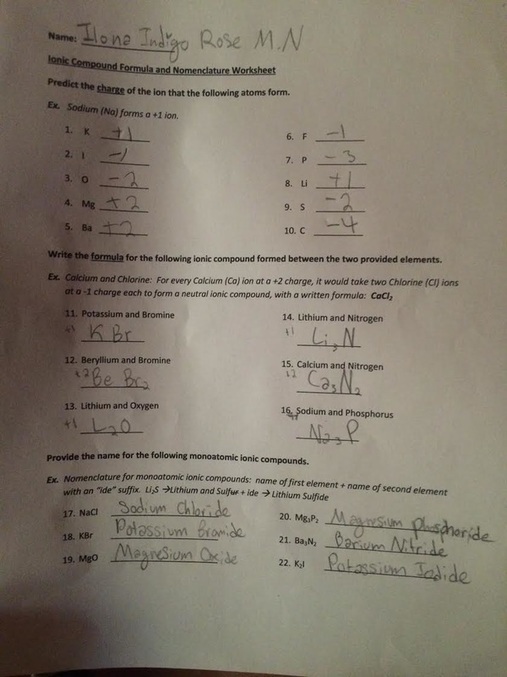 The first part of this worksheet was a little more comprehensible because all to took to understand was looking at the name of the first element in the compound and adding the correct number depending prefix. Then I had to change the second elements suffix to "ide". The second part was little harder but overall it helped me understand covalent compounds better. 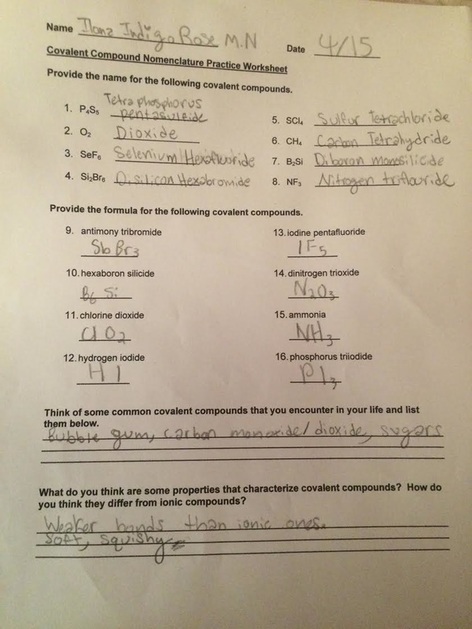 This worksheet was hard for me, especially the second half. I found it interesting to learn the new definitions and label the atom/molecule, but it was hard to fill in the atomic diagrams. I had some trouble with the first one and the third one but with some help I was able to better understand them, I still need to follow up to get a full understanding of this kind of topic. 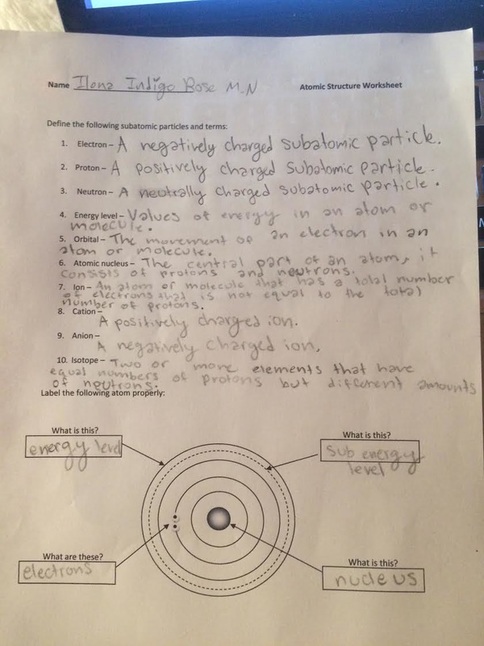 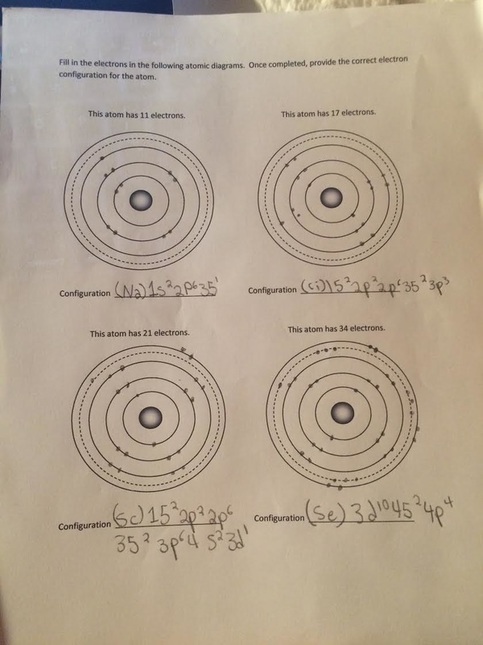 By doing this worksheet I was asked to break things down enough that a five year old could comprehend them. Because of this I had to actually understand each prompt well myself, and I learned things I might not have otherwise if I didn't have to make it so simple. 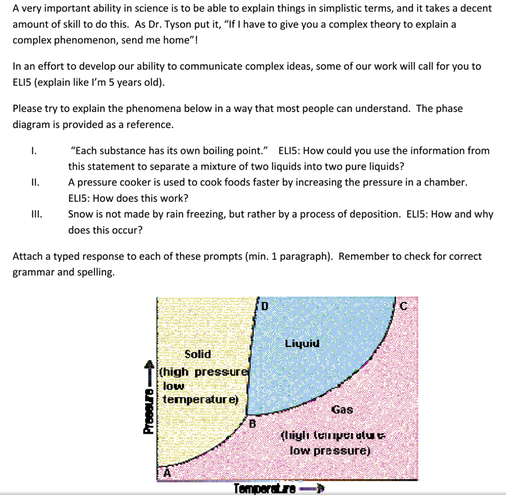 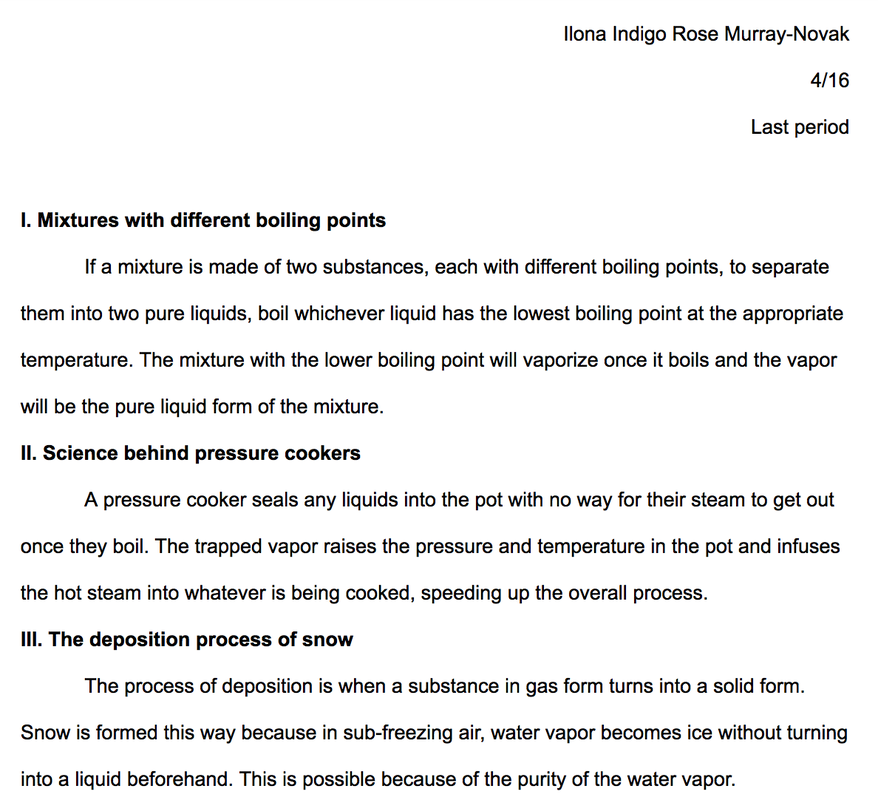 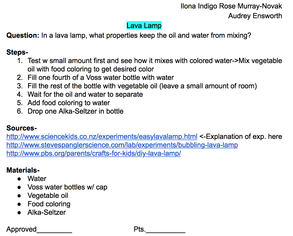 For a fun and groovy spring break experiment my partner and I made a lava lamp!
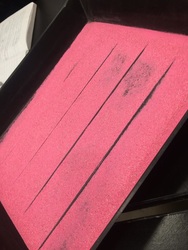
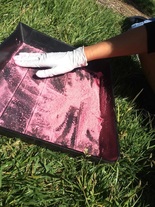
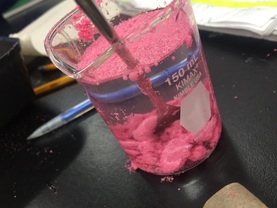
After a couple tests to see how food coloring would react in our lava lamp, we got a tall Voss water bottle and filled a quarter of it with water. We then then filled the other 3 quarters of the bottle with vegetable oil, leaving a small amount of room at the top. We waited for the oil and water to separate and then added a couple drops of blue food coloring and one Alka-Seltzer for extra bubbly fun. The bubbles were a little more scattered than we hoped, but it looked like a real lava lamp for some time! We focused on the question, "what properties keep the water from mixing with the oil." After watching a video on the incredibly large power of penny batteries, the class got into groups to make their own. Each group received about ten pennies (all made after 1986). These pennies are made from 7.5% zinc, 2.5% copper and are more purposeful because of this. We had to make a positive and negative side (like a battery) by removing the copper from one side. We went outside and scratched the pennies on the ground under our feet on the cement. When we finally achieved this as well as we could, we went back to class and cut 1 in. x 1 in. cardboard squares. Then we soaked them in a beaker of vinegar for a half minute or so. We then set penny by penny on to of a piece of foil and put the squares in-between the pennies. We ended up using seven pennies in our battery. The last penny was left uncovered because it was time to test our battery. We put one side of an LED (light emitting diode) on the foil and the other on top of the penny tower. The LED lit up bright like it was being powered like any store bought battery. What I learned from this experiment is that battery power isn't as challenging to create as it seems, the most average unsuspecting parts can make a long lasting power source for something like an LED! Below are some images of the battery and LED. 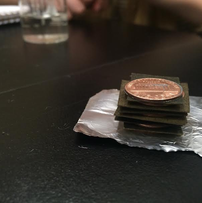 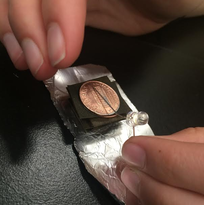 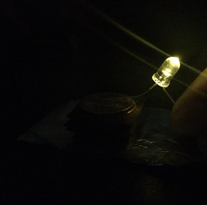 In order to learn about a new unit on different properties of mixtures, Andrew led a class experiment on making, "magic sand." Sand that doesn't get wet like normal sand does. To start the experiment, my table group and I poured pink reptile sand in the bottom of a large black tray. Once all the other groups had finished this task, we all went out side and sprayed our sand with 5 layers of silicone spray, which would make the sand waterproof, we mixed up the sand in-between each spray. It took a while for everyones sand to dry, but when they were all ready we went inside to test the efficiency of our waterproof sand. We filled beakers of water and added small amounts of sand into it. Instead of mixing with the water, the sand globbed up into little clumps. Each clump appeared to be waterproof and this was confirmed when we lifted the sand out of the water and it collapsed into its usual grainy form, except it was totally dry! Before spraying the sand we went through a lesson on ionic and covalent compounds. Ionic compounds form between metals and non metals. They're held together by strong ionic bonds. In ionic bonds, positively charged ions are called cations, negatively charged ones are called anions. These two kinds of ions come together to form ionic bonds, where they transfer electrons among themselves. Covalent don't need metals to form, they do so between nonmetals, here, electrons are shared instead of being transferred. Two terms that heavily applied to this experiment are hydrophilic and hydrophobic. Hydrophilic substances dissolve in water and are ionic as opposed to hydrophobic substances that don't dissolve in water. How does this apply to the experiment? The unsprayed sand we began with was hydrophilic, it would have gotten wet if we had exposed it to water. When we used the silicone spray, thanks to it's waterproof coating properties, the sand became hydrophobic, and also became a covalent compound. I thought this lab was interesting because I didn't expect a noticeable difference in the sand, I thought it would just get darker and feel wet, but the sands relationship with water after the silicone spray was very different than just a little less moisture. Below are some images from my group's process.
 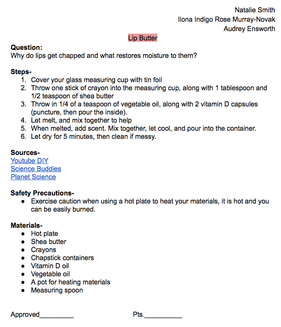 Inspired by our mutual frustration with lip care products, and wanting to avoid store bought Chapstick additives like alcohol, my partners and I decided to create our own healthy alternative! The obvious first step to making your own lip moisturizer is to find out what the best ingredients are to make an effective lip product, so we did. After some research on the internet, we decided to use shea butter, vitamin D oil, and vegetable oil to restore our lips to their upmost health. As well as these we added a non-toxic crayon base for color and form, and some vanilla extract for a light scent. On experiment day, we used a hot plate and a pot to boil the ingredients once the crayon had melted. Once it was a liquid we let it cool for a while an then poured it into containers to set. It took all night to cool but once it was it served its purpose well! The question we focused this experiment around was, "why do lips get chapped and what restores them to moisture?" The layers of skin on the lips is much thinner than that of the rest of the body, because of this, they're much more susceptible to changes in weather and climate. From this experiment I'm knowledgable on what vitamins are nourishing for dry lips. I liked this experiment because it was physically useful and I love learning about the human body, no matter how small a detail of it. Below are images of the process and finished product.  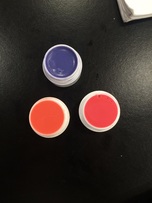 |
AuthorWrite something about yourself. No need to be fancy, just an overview. Archives
May 2015
Categories |

 RSS Feed
